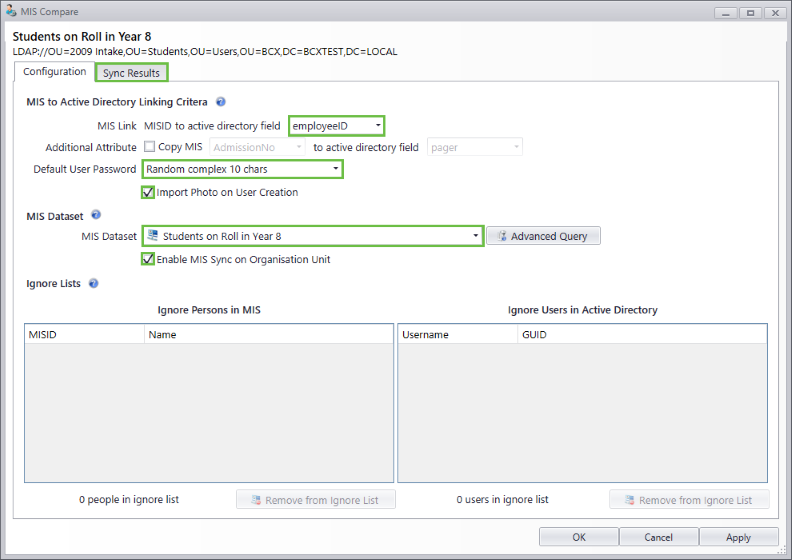
'MIS Link' – You can specify which AD field you would like the MISID to be stored in.
By default this would normally be the 'employeeID' field but if this is already being used for other software,
(such as Cashless catering or access control) you can select another AD field to write the value to.
'Additional Attribute' – If you would like to copy an additional MIS attribute to AD then tick this box,
and select the MIS attribute and the field in AD you would like it written to.
'Default User Password' – When a user is created via the MIS Compare tool,
you can assign a default password selectable from the drop down list.
To choose your own custom static password, chose the second option in the list
"Custom", and manually type the password you want to use.
'Import Photo on User Creation' – Tick this box to import photos
from the MIS dataset into Active Directory when creating a new user.
'MIS Dataset' – In this drop down list you will have a list of all the Datasets available from your MIS.
Select the one that will contain the matching users for the OU you are currently configuring the MIS Compare for.
You can click the 'Advanced Query' button if you need to make custom changes to the query,
but we would advise these changes are only made after checking with Burconix Support.
'Enable MIS Sync on Organisation Unit' – Once you tick this option a 'Sync Results' tab will appear at the top of this window.
'Ignore Lists' - This table will become populated with any user(s) 'Ignored' during the matching process.
 | Back |
|  | Step 3: Sync Results - Automatch |
|


